Racing: Cartridge Forks, R is for Racing! *In progress 20/10/20*
This is a work in progress but as the blog is being written at the same time as I am working (for a change), I thought I might as well publish it to make it a live update of sorts. So do pop back in the future to see when I finally give up and set the lot on fire.
The "From Road rashed to race" Blog entry very quickly got a bit out of hand so I have removed some detail and made it more of a story. The real bones of any particular job, such as this one, are now in separate blogs which I will link between whenever relevant. This should make it easier to find useful info whilst still getting it all down.
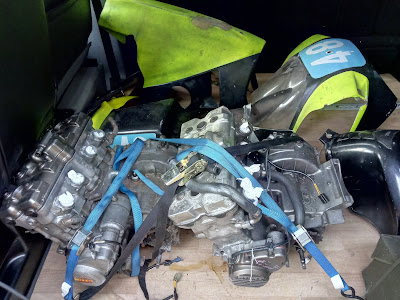
During the time I spent fart assing with engines, for the bikes strip down, I had spent a lot of time head scratching on the computer. Some of that time was on ebay and in doing so I had found the odd useful part. One in particular was a set of forks. They were listed as tidy but missing a damper rod and listed at a fairly low price as a result. Nothing remarkable there but what had caught my eye was the image on the right.
The CBR400RR NC29 saw a few minor upgrades, mostly to paint, over its life span but Honda waited till the end for the best bits which ended up on the CBR400RR-R model. We aren't talking light years ahead of the L, which I have, but the R does have a few snazzy bits. Most notably the forks. They are rebound and compression adjustable cartridge forks and the image above showed a set at a fraction of what they normally sell for. Of course it wouldn't be that simple but for now, I had a good idea of what I was buying.
I hit buy it now and a few days later they were at my front door. Without even opening the packaging I got them in the van for a trip to Classic Racing Green to chat with Andy about sorting that missing damper rod and upgrading the springs.
Whilst Andy bounced around sorting another customers custom modified RGV forks I quickly pulled the offending fork apart to see what was wrong. The one that just bounced with no damping had its top popped off and sure enough there was no rod attached so it came away completely. I could then pick out the spacer showing the spring and something else.
At this point Andy wondered in and I showed him. With the spring placed to one side he attached a piece of threaded bar to whatever fitting the cartridge had and lifted it upwards. "So what should be attached to that?" I asked Andy to which he indicated the cap. "So it just screws straight on with nothing else, no other needle or damper rod?" I pressed. "No that is the damper rod and the needle is inside the cap look" replied Ady now looking confused like I had gone a bit thick. "Well that is interesting, these were sold to me as the damper rod was missing!".
We figured between us that the previous owner had stripped a fork leg allowed the damper rod to unwind from the fork cap resulting the the cartridge dropping to the bottom of the fork. When he, or a breaker later inspected the fork they couldn't see the damper rod and simply assumed it was missing. Well that is good news for me!
With luck, a clean up, new seals, springs and maybe a reshim, I should have a sorted front end on the little Blade.
To start thing off I would need to get stripping. This would be quite nice to do without the bike dangling from a rafter beam as I didn't have to take them from the bike. It will be interesting to compare this job to the relatively quick to service cartridge forks I did a couple of years back.
I would tackle this job once I have some space after all the other fun I have been having.
And that day came.
The untouched leg came apart with no difficulty so I set that aside draining stinking grey fork oil into a drip tray.
The partially disassemble fork was in the state it was thanks to the lower bolt being mangled. A quick try with an impact driver didn't shock it out so I wasted no time and got out the easy out set.
I had some new ones with a cutting edge on one and and extractor the other. Access was a problem due to the design of the fork leg but a 1/4" socket on an extension did the job. Drilling was no issue and the extractor bit nicely but then ruined everything by shearing.
Now I had a seized bolt with a hardened steal dome in the middle. Bloody brilliant!
I then managed to spend the rest of the day trying most of the drill bits I own to get something to bite interspersed with hitting the thing to try and make the broken extractor end shatter.
After much brutalisation, the head of the bolt finally came apart and the damper tube was knocked out with the bolt thread still in it.
Of course, what remained of the bolt simply unwound from the damper rod with no resistance now it was free of the leg. Tosser.
Of course, what remained of the bolt simply unwound from the damper rod with no resistance now it was free of the leg. Tosser.
Another afternoon's works came in the form of stripping and cleaning the forks internals.
The oil was in a horrible state making me suspect it was original and probably had a hand full of swarf chucked in for good measure. In fact I am sure I found bits of grave in one leg!
The leg design is very similar to the CBR600 F3 which is unsurprising. Aside from being shorter; all I could find was a subtly different cartridge design as a difference. I'd say that a lot of stuff in there is interchangeable save for lengths being different.
Both the compression and rebound valves were stripped and cleaned in the sonic bath.
The damper rods themselves are peened at the end. I just wound the nut off the end and then tidied up the threads after. You might get a better result grinding the end of the rod but doubt it would make a huge amount of difference. The parts were then dried, inspected and reassembled paying attention to the shim/washer build up of: seat, spring thick shim, valve, thin shim stack, small shim, smaller shim, spacer and nut. The cartridge is the same, if you are unsure of the build up, just photograph everything before you take it apart. Be careful the thick shim is seated on the seat as it can get pinched when tightening the bolt.
Everything else was cleaned ready for reassembly. The fork legs were painted as they were a bit beaten up. I didn't go mad on prep and finished them in Kia titanium silver which isn't a million miles off the metallic brown the forks came painted in.
The following morning the forks were lacquered whilst the internals were reassembled and laid out.
Once the clear coat was touch dry, I rebuilt the forks and brought them over to the garage to swap out.
I dropped the forks out of the bike after a bit of a fight with rusted on mudguard fasteners but soon noticed a problem. The caliper brackets looked different.
Once they were side by side, the difference was more apparent, as was the difference in length.
I checked the number stamped on the fork leg lower: MR8-L/R on the internet and Honda VFR400 NC30 1991 came up. Well that would make a lot of sense. Later on the VFR400 got upgraded cartridge forks too. Unfortunately for me, the ebay seller I had bought my forks from not only misidentified the type of fork but what model they even came from!
As the disc and front wheel size is the same on the NC30, I have bought a set of front brake calipers as the NC30 got better brakes anyway. SES also do conversion plates for Brembo or SP2 type Nissin calipers which gives me options if I want even more front brakes. A small annoyance but this might end up being a little bit of a blessing.
20/10/20
The calipers plopped onto the forks and wheel married up nicely but for the life of me I couldn't get a CBR400 wheel spindle to fit so a VFR one was ordered. This was clearly a waste of time however as they are the same on pretty much everything.
The culprit turned out to be the replacement cap head bolt I had stuck in the bottom of the damper rod. It was too long and stopping the spindle from passing through. This was quickly "tidied" with the help of a die grinder allowing me to assemble the front end finally.
The brake lines have no got a bottom yoke guide in the form of a P clip making use of the horn mounting point so the lines aught to be fine still which is good news.
A left hand side caliper bolt feels like it needs a helicoil but that aside, the front end is all together. I will stick some oil in the forks and service the brakes later on and then this little job is done.


Comments
Post a Comment