Race: From road rashed to race bike *In progress 01/09/20*
This is a work in progress but as the blog is being written at the same time as I am working (for a change), I thought I might as well publish it to make it a live update of sorts. So do pop back in the future to see when I finally give up and set the lot on fire.
This Blog entry very quickly got a bit out of hand so I have removed some detail and made it more of a story. The real bones of any particular job (Like the sodding engines) are now in separate blogs which I will link to whenever relevant. This should make it easier to find useful info whilst still getting it all down.

I didn't waste any time getting stuck into the new CBR400RR-L NC29.
It had crash damaged fairings.
It had crash damaged engine cases.
It had crash damaged front fairing stay.
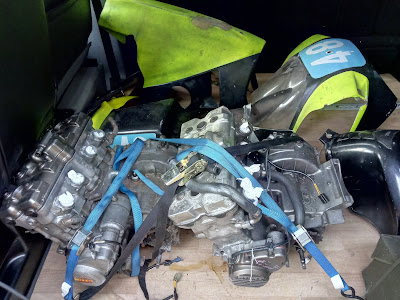
It had chain lube and engine oil pretty much everywhere.
 I needed to get this thing apart to find out how much work I had to do.
 I had already been shopping for bits and had a pile of spares sat in the shed ready to go.
 As clutch side engine cases were proving very expensive (and I had no idea what else would be broken in the engine from its spill) I had just bought two complete engines along with a fairing and some other bits from a local breakers in Boston. A lot of the parts are from an NC23 but I was hopeful that I could use them on the NC29. Well I knew the engine would fit at least.
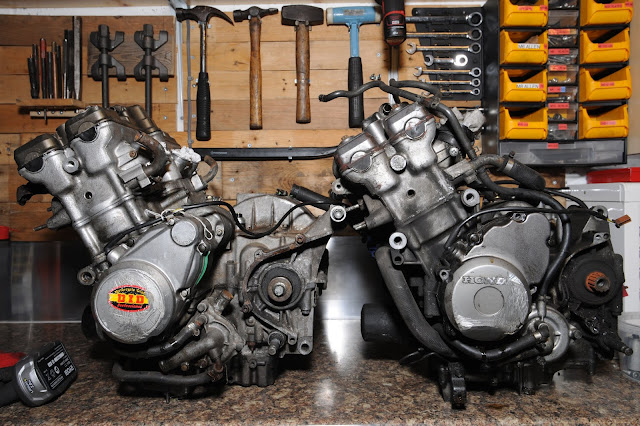
A bit of engine invest had already shown that both motors turned over and selected gears well.
The NC23 motor would need different carbs due to different inlet port spacing so that one wasn't going to get used any time soon but the motor with NC29 heads seemed okay for a straight swap should I decide to go down that root.
 Before I got the bike too far apart I gave everything a quick test using the other CBR400's battery. The bike did turn over but the flywheel, now an external components, spun with an eccentric motion indicating a bent crank end. Not the end of the world as that can be sorted but with the good chance of contamination from its crash and possible oil starvation, I opted to replace the engine for now and work on this one later.
Next up the Yamaha RD250 got squeezed to one side (waiting on little end bearings as this dummy ordered the wrong ones for his annual top end rebuild) and the CBR got dragged in.
I could now methodically remove all of the fairings to see what joys where hidden underneath. So far, so good however. The loom looked pretty much unmolested and there weren't any broken bits above what I already knew about and a few fairing brackets.
Even the random mix of fairing fasteners all behaved save for the belly pan which looked so rough, I just didn't bother taking it apart.
With the fairing off I tried to test fit the NC23 tail unit which would probably fit with some alteration to fairing tabs of the subframe. I didn't want to do this though and I really wanted an NC29 fairing anyway so this got chucked on eBay with everything else I wasn't going to use. I may later try and fit the front fairing just out of curiosity really.
Next off came the wiring loom, drive chain, exhaust system, radiator and finally the engine with no real arguments.

I now had a mostly stripped motorcycle which gave me a good opportunity to drag it outside for a clean. The wheels were absolutely caked in gunge so I first went at them with wonderwheels which sorted all but the chain lube.
Next up I jetwashed the whole bike before covering it with snow foam and worked it in with a brush before another rinse.
With everything cleaned I now had a better idea of what the condition was like, which was pretty good. Well I say everything. The swingarm and rear wheel still had a healthy coating of chain lube to clean off. I was going to need to get the degreaser out.

Turns out quite a lot. Engine mounts are different in levels and spacing, cooling design, mountings for the thermostat, separate barrel from cases, wiring and god knows what else.
That's not to say it wont fit, just more of a pain. My investigation continued, for days, and a lot of really interesting nerdy stuff was learned. I have separated that out here on its own blog which you can spin across to later if you want to know more about this part of the build. I also have a compatibility sheet here which will be influenced by a lot of this work so you might want to know about that too.
 |
| NC23 Left NC29 Right |
 One in particular was a set of forks. They were listed as tidy but missing a damper rod and listed at a fairly low price as a result. Nothing remarkable there but what had caught my eye was the image on the right. They looked to me to belong to the later CBR400RR-R model which have the advantage of being rebound and compression adjustable cartridge forks.
I hit buy it now and a few days later they were at my front door. Without even opening the packaging I got them in the van for a trip to Classic Racing Green to have a poke about these forks with Andy. After a bit of said poking;we not only found out that they were in good condition (as advertised) they were also complete!
I could now rebuild these and have a properly sorted front end on the Blade. I could go on but you will find more detail on this part of the build here.
With the bike in bits and now without a usable engine, I decided to get on with other jobs. Seeing as the little end bearings had shown up for the RD; I wheeled the CBR out of the way and got on with the more important machine.

Meanwhile, all of this COVID19 business kicked off giving me time to get on with jobs. One of which was this little CBR project. The engine got the bulk of the look in here but I also got to looking into other parts like chipping away at 30 years of chain lube (why do people not keep this part of a bike clean?) and ordering parts when they came up cheap. A couple of sets of SES rearsets werea bargain purchase, as was a nice looking end can to replace what the bike came with. Also a race Koso instrument cluster went in the box for later.
 After a fair bit of cleaning effort the best of the rearsets were also cleaned down and fit.
The left side is straight forward with the long bolt at the bottom (I assume, it fits?) and some spacers chucked in behind the plate.
The right side has the front brake master cylinder behind the plate and held in by nuts and bolts. The increased angle on the master cylinder makes the brake line very tight so this has got me to hurry up and buy a braided line and HRC reservoir.
Both pegs now sit about 30mm further aft and 25mm heigher. This is a pretty comfortable yet racy position, I like it!

Something else that needs sorting is the handle bars and switch gear.
The stock handlebars are heavy, hard to come by if I bend one, set higher and they are at a softer angle.
A replacement set of 41mm handle bars were ordered from the fine engineering country of China and slung on the bike once they had been dropped of by my hard working post person.
 They will need cutting down but they will do nicely.
Some grips are in the post (still) and some switch gear is waiting for me to wire it all in. All in good time though.
For now an easy job is done and another is ready to get started with.
 The top yoke had a fetching yellow sticker on it, in keeping with the Rossy-tastic look of the bike. This wasn't going to make it to the final cut. Why do I keep buying yellow CBR400's?
 The decal was scraped off and the top yolk was taken to the sand blasting cabinet where it was cleaned up as best it could manage (I really need a bigger compressor) before cleaning it up ready for paint. Controversially, I prefer paint to the clean ally of earlier Honda's. I didn't need to do much other prep bar cover over the Honda badge.

This is sprayed on in fairly quick and in heavy layers before getting thrown in the oven to cook off. Timings are important as is getting your layers down evenly but the instructions on the can got me through. I think a slightly heavier paint layer would have gotten it perfect but it has come out pretty good.
Bodywork

I only really had one option and that was to buy the GFRacing bodywork set.
Need for more parts for the engine and having some time and money to play with saw me driving up to their workshop to plunder some parts.
The fairing is well thought out in some respects with a one  piece tail unit featuring a removable panel to enable you to fit it more easily and acces the standard rear brake reservoir. It also comes with DZUS fasteners already fitted which is one less job for me to do.

I opted to fit the fairing to the bike to mostly keep it out of the way. It was also nice to see it on the bike for a little bit of visual progress.
I stopped short of drilling holes for the upper fairing brackets as they are all bent and will need replacing with aftermarket alternatives. I am currently in two minds to just buy something or make it myself. We shall see.
Brakes

The rear disc is fine for what I want, it rarely gets used anyway. The fronts end however got treated to a pair of EBC's finest floating discs. The OEM discs look pretty tired by comparison so they got removed, measured and slung on ebay.
The new discs were mounted up to the wheels to make sure I had got the correct ones. I had in fact ordered the wrong ones at first (queue confusing story). They were ordered for the VFR750 RC24 which has a CBR600 F3 wheels. The F3 front wheel is the same as the earlier F2 and its little sister the CBR400RR-L. Unfortunately the chassis code F3 is the same as the late 00's CBR600RR-F3 year code which is what EBC use in their catalogue. Thankfully they were happy to accept these back and a set of CBR600-FS front discs were sent out. No not the early naughties F sport, that's something different again. Confused yet?

The wheels still needed sending off for powder coating so the discs were removed again while the wheels were tidied up.

I bought a set in transparent red, as that's what I have on the VFR, which come with banjo bolts and washers too.
A few weeks later I had them in hand so I slung them on the bike.
The front is a twin line setup which are standard fair for race bikes but a pain in the ass to make look tidy. I got them to sit as best I could then tightened them down and bled the brake system with Motul high performance Dot4 brake fluid.
The rear is normally much easier to fit being one line yet is often overlooked as it gets far less use than the front. An aftermarket line is however still much lighter than OEM and looks lots better.

When I came to fit the supplied rear line, I could not make it fit. It was too short with the end fitting angles not helping matters either. I could partially blame this on the race rearsets I had fit but something was wrong. Well the something was it was too short as demonstrated above against the OEM line. Thankfully after a bit of messaging with the seller, I managed to convince them I wasn't completely stupid and they sent a replacement which was 30mm longer.
It is also worth noting (something I had forgotten) that the Hel end fittings, and so these as well, can be turned using the technique on the right. A nifty trick to fine tune the fit to your liking and relieving strain.
To finish off the brake setup, I swapped the rear brake reservoir for an HRC unit. I have these on all of my bikes as they look tidy, are lighter (I mean we are talking grams but...) and it has HRC on it so therefore I can justify having HRC stickers on the bike. That's the real reason.
 | |
|
01/09/20

Andy let me loose on is pneumatic tyre machine where I could swap the tyres so much quicker (and with a lot less damage) than using my mechanical tools at home. The CBR400's wheels were back from the powder coater's so I just had to slap in some new Koyo wheel bearings in and try not to chip the powder coat whilst I fit the tyres. Needless to say, I fit the VFR's tyres first to reduce the chance of me making a mess.
I did opt to fit a 150 section rear on the 400. It is pretty popular to fit a 160 but I want better turn in so went for the narrower option.
Comments
Post a Comment