Racing: Engine rebuild 19/07/2020
This is a work in progress but as the blog is being written at the same time as I am working (for a change), I thought I might as well publish it to make it a live update of sorts. So do pop back in the future to see when I finally give up and set the lot on fire.
The "From Road rashed to race" Blog entry very quickly got a bit out of hand so I have removed some detail and made it more of a story. The real bones of any particular job, such as this one, are now in separate blogs which I will link between whenever relevant. This should make it easier to find useful info whilst still getting it all down.
This story follows on from another branch of the rebuild where I fantasised about sticking an NC23 engine in the NC29 which you can't do. As a result of this, and with a lack of spares on the market, I was looking at repairing the engine I had.
 The main issue I had was that the crank appeared to be bent thanks to the previous owners crash damage.
I had the option to just take the ignition kit off and run it as a total loss but I knew that I wanted to run it in superstock and that generally isn't allowed, or is it very practical.
So without a replacement engine as an option any more I was going to need a replacement crank.
I did briefly flirt with the idea of popping the crank out of an NC23 engine and sticking it in the NC29 but I didn't really fancy all of that work just to find out that didn't fit either so found a good cheap second hand one to stick in my bike.
Whilst I waited for that to show up I thought I'd get this engine stripped ready and have a good look around for any other damage just in case.

I intended to strip the whole engine as I had the gaskets to do it which would give me the opportunity to really get the engine tidied up.
Seeing as I had the top of I did give the valve gaps a quick check. All of them were towards the upper end of their limits bar cylinder 3's inlet which was a bit over. I noted all of this down for the future. I didn't go buying shims yet which will become clear why later.
Next up I was onto stripping the engine down. Let's see how bad this thing really is. I used a Haynes manual for the strip, They are cheap and easy to follow so I won't go into any detail about the strip other than any work arounds I had.
 The bottom end came apart with no real dramas using a Ryobi impact gun for everything I could. The variable impact strength made short work of all of the fasteners no matter how cruddy they were and no breakages. Winning!
By now the new crank was here but I had to strip the top end still. I Also took the time I had spare to clean and degrease the sump and water pump which were pretty feral.
 Next up; the head needed to come apart. Well it didn't but seeing as I am here I might as well get carried away with it all.
 The cam retaining caps came off and without a chain to hinder them, out popped the cams.
These looked relatively okay with a little scoring on one or two lobes but nothing serious. I have got some potential race cams in another engine but being of NC23 descent, they wouldn't fit without messing with drive gears which I do not fancy. As such these were placed to one side and I got back to that head.

A conveniently purchased valve spring compressor was unpacked and the smallest end fittings slipped on which thankfully fit.
I had a few sectioned trays that I had picked up from Lidl. These things are ace for keeing things in order and can be scrounged for 50p if you get lucky like I had.
I carefully labelled up the segments and worked my way along the head removing the four valves, springs, buckets shims and eight collets for each cylinder.
It is pretty damn important to keep this all in the right order. If you don't, it isn't the end of the world but it will get more expensive, not to mention more laborious to rebuild.
With the valves out of the way I could dig out my other new tool, a valve seal removal, fit tool to pull out all of the valve seals, shockingly enough.
With another job down I could now asses the head.
It looked pretty good with some staining on the cam side from infrequent oil changes, a lot of soot and oil stains on the combustion side but was otherwise an unmolested and mechanically sound head.
I then stuck it in the degreasing bath to remove all the grime I could.
My aim here was to smooth out rough casting marks and port match wherever possible. A Dremel isn't the ideal tool but it is the tool I have and with a bit of understanding and care, good results can be had.
The result I was going for is called "Blue printed" so as to make the engine as factory as I could without going too far and making the head "tuned" wich would make it no good for superstock. This won't unleash much if any power but it will make the engine as good as it can be for a factory engine.
The inlets were actually very good with the biggest change being a 1mm oval on port 2. The exhaust on the NC29 is famously too big already so other than removing a fair amount of soot, and the off rough edge, I mostly left it alone.
There were a few rough mould marks in the cam side of the head which did get a good looking at. Some of these were quite prominent thus taking up more of my time than expected.
 In fact I have far more fiddling to do but I was hitting tasks as I went along.
 Next I transferred the clutch actuator from the old clutch cover to my shiny new one (covering it in oily finger prints in the process). It is pretty straight forward to do with the one "gotcha" that might catch you out: the roll pin can be driven too far into the arm causing it to no longer engage the spring and making it impossible to remove it after you have spotted your mistake. Thankfully I was pre-warned of this and avoided this mistake.
 Now all that was left was the top end rebuild. I had already assembled the head so the faces were checked and cleaned before being dry assembled with a new gasket in between. All of the nuts torqued down fine with only the aft bolt going into that horrid plastic region before hitting toque. I had this a few times on these cases with the low 12NM torque 10mm bolts and will have to give my torque wrench a bit of a calibration to ensure it isn't over doing it. Mind you; it could be the 30 year old cases rightfully protesting at not being turned into bean tins yet.
Cams followed the head with a fair bit of faffing to get them to engage the drive gear at the correct angle. The exhaust was fine but I struggled to get the inlet right as the anti chatter gear would engage first pushing the cam one tooth out. this was hard to see at TDC 1 cylinder firing so I turned it to TDC 4 cylider firing where the markers face each other in the middle where it was far easier to see when the cams were aligned. This did make getting the anti chatter gear in even harder due to cam lobe positions but a bit of persuasion with a flat blade got it in the right place whilst I carefully wound the cam retainers in. These were all torqued down and suddenly the engine was all but done.
I could now stick the engine to one side and get on with sorting the poorly RD engine out.

This story follows on from another branch of the rebuild where I fantasised about sticking an NC23 engine in the NC29 which you can't do. As a result of this, and with a lack of spares on the market, I was looking at repairing the engine I had.
 The main issue I had was that the crank appeared to be bent thanks to the previous owners crash damage.
 I had the option to just take the ignition kit off and run it as a total loss but I knew that I wanted to run it in superstock and that generally isn't allowed, or is it very practical.
So without a replacement engine as an option any more I was going to need a replacement crank.
I did briefly flirt with the idea of popping the crank out of an NC23 engine and sticking it in the NC29 but I didn't really fancy all of that work just to find out that didn't fit either so found a good cheap second hand one to stick in my bike.
Whilst I waited for that to show up I thought I'd get this engine stripped ready and have a good look around for any other damage just in case.

Strip
I intended to strip the whole engine as I had the gaskets to do it which would give me the opportunity to really get the engine tidied up.
Seeing as I had the top of I did give the valve gaps a quick check. All of them were towards the upper end of their limits bar cylinder 3's inlet which was a bit over. I noted all of this down for the future. I didn't go buying shims yet which will become clear why later.
 |
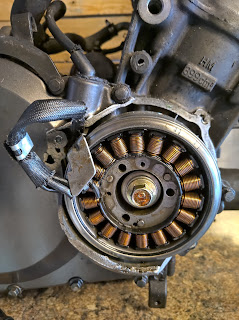
| With half the clutch cover missing, I was happy to find another marker on the case |
 |
| The chain wrench did a nice job of holding the rotor still without marking it |
 |
| Sump off and things don't look too scary |
 |
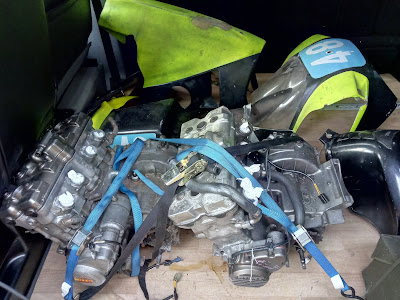
| Oh so many parts. This is no 2 stroke strip! |

By now the new crank was here but I had to strip the top end still. I Also took the time I had spare to clean and degrease the sump and water pump which were pretty feral.
 Next up; the head needed to come apart. Well it didn't but seeing as I am here I might as well get carried away with it all.
 The cam retaining caps came off and without a chain to hinder them, out popped the cams.
 These looked relatively okay with a little scoring on one or two lobes but nothing serious. I have got some potential race cams in another engine but being of NC23 descent, they wouldn't fit without messing with drive gears which I do not fancy. As such these were placed to one side and I got back to that head.

A conveniently purchased valve spring compressor was unpacked and the smallest end fittings slipped on which thankfully fit.
I had a few sectioned trays that I had picked up from Lidl. These things are ace for keeing things in order and can be scrounged for 50p if you get lucky like I had.
I carefully labelled up the segments and worked my way along the head removing the four valves, springs, buckets shims and eight collets for each cylinder.
It is pretty damn important to keep this all in the right order. If you don't, it isn't the end of the world but it will get more expensive, not to mention more laborious to rebuild.
 |
| Tidiness leads to easier rebuilds |
 |
| New blanks were on order already |
With another job down I could now asses the head.
It looked pretty good with some staining on the cam side from infrequent oil changes, a lot of soot and oil stains on the combustion side but was otherwise an unmolested and mechanically sound head.
I then stuck it in the degreasing bath to remove all the grime I could.
Fiddling about
With that done I took the head to the workshop and dug the Dremel out.My aim here was to smooth out rough casting marks and port match wherever possible. A Dremel isn't the ideal tool but it is the tool I have and with a bit of understanding and care, good results can be had.
The result I was going for is called "Blue printed" so as to make the engine as factory as I could without going too far and making the head "tuned" wich would make it no good for superstock. This won't unleash much if any power but it will make the engine as good as it can be for a factory engine.
The inlets were actually very good with the biggest change being a 1mm oval on port 2. The exhaust on the NC29 is famously too big already so other than removing a fair amount of soot, and the off rough edge, I mostly left it alone.
There were a few rough mould marks in the cam side of the head which did get a good looking at. Some of these were quite prominent thus taking up more of my time than expected.
Rebuild
Now for the reverse of the strip right?
 In fact I have far more fiddling to do but I was hitting tasks as I went along.
Again, the Haynes manual is a superb guide to getting this thing back together even if it is the reverse of installation and the back and forth with chapters (not to mention finding the torque settings) that come with it. With transparent sheets on the book to reduce greasey thumb prints I got on with it.
First up I stuck a piston ring kit on the freshly cleaned up pistons as a courtesy whilst I had them out. The kit was from China so we will see if that was a mistake or not. When I gapped them up however, they came up perfect so hopefully they will be fine. The pistons went in okay by hand with the rings staggered and the freshly honed bores lightly coated in oil.
I took the cases to the degreasing bath after this (working in a logical order of course) taking care not to get any degreaser into the barrels. It would have been nice to get them aqua blasted but its all time and money I don't have to make a thing you will hardly see look nice. The degreaser did a good job however and made things look a fair bit less grotty.
 With the pistons and conrods in, I could now fit the new crank. As it has slightly different tolerances I was expecting to have to go shell shopping which a check with plati-gage confirmed. I contacted GFR to see what their shell stock was like and they were all to happy to help. It was not long after then that I spotted I had fit my shells, labelled 1-4, in 4-1 order as I had forgotten to take into account the engine being upside down.
A recheck with the shells in the right place showed all of the shells were in tollerence. I later found out that everyone just bins the stock shells and runs C's to keep the engine loose and friction free anyway so that was a waste of time.
All of the old plasti-gauge was cleaned off and the shells lubed up with Molybdenum grease before getting torqued back down.
I took a trip up to GFR after my chat to them on the phone and collected a replacement clutch cover and race fairing. At this point the first round of the CRMC was announced and my attention turned to the other bikes in the stable to get them ready for Cadwell park.
After said event I had to fix the RD250 as its engine decided to try and eat itself so this motor needed finishing off to make room for the smaller Yamaha lump.
 Continuing to follow the process laid out in the Haynes manual, I fit the case halves together followed by the oil pump and secondary pick up before the sump could go on.
The drive for the oil pump was next with the loose chain hooked up to it followed by the bushing which brought the chain tension in.
I skipped fitting the flywheel as I was building this engine without a generator (mine was quite broken anyway). I was still using the flywheel for timing though so it was loosely on and off a few times in this build.
 The oil pump drive gear was followed by the clutch which now features EBC's SRK clutch kit with aramid fibre friction plates and uprated spring. All of which was soaked in clean oil during assembly.
EBC's clutch holding tool made torquing things up easier but the handle is a bit on the short side and the engagement is pretty shallow which makes things a bit dicey when trying to torque to 86NM. This was backed up by a penny in the drive gear in the end to apply the full torque. An old faithful tool but works perfectly.First up I stuck a piston ring kit on the freshly cleaned up pistons as a courtesy whilst I had them out. The kit was from China so we will see if that was a mistake or not. When I gapped them up however, they came up perfect so hopefully they will be fine. The pistons went in okay by hand with the rings staggered and the freshly honed bores lightly coated in oil.
I took the cases to the degreasing bath after this (working in a logical order of course) taking care not to get any degreaser into the barrels. It would have been nice to get them aqua blasted but its all time and money I don't have to make a thing you will hardly see look nice. The degreaser did a good job however and made things look a fair bit less grotty.
 With the pistons and conrods in, I could now fit the new crank. As it has slightly different tolerances I was expecting to have to go shell shopping which a check with plati-gage confirmed. I contacted GFR to see what their shell stock was like and they were all to happy to help. It was not long after then that I spotted I had fit my shells, labelled 1-4, in 4-1 order as I had forgotten to take into account the engine being upside down.
 A recheck with the shells in the right place showed all of the shells were in tollerence. I later found out that everyone just bins the stock shells and runs C's to keep the engine loose and friction free anyway so that was a waste of time.
All of the old plasti-gauge was cleaned off and the shells lubed up with Molybdenum grease before getting torqued back down.
I took a trip up to GFR after my chat to them on the phone and collected a replacement clutch cover and race fairing. At this point the first round of the CRMC was announced and my attention turned to the other bikes in the stable to get them ready for Cadwell park.
After said event I had to fix the RD250 as its engine decided to try and eat itself so this motor needed finishing off to make room for the smaller Yamaha lump.

The drive for the oil pump was next with the loose chain hooked up to it followed by the bushing which brought the chain tension in.
I skipped fitting the flywheel as I was building this engine without a generator (mine was quite broken anyway). I was still using the flywheel for timing though so it was loosely on and off a few times in this build.
 The oil pump drive gear was followed by the clutch which now features EBC's SRK clutch kit with aramid fibre friction plates and uprated spring. All of which was soaked in clean oil during assembly.
 Now all that was left was the top end rebuild. I had already assembled the head so the faces were checked and cleaned before being dry assembled with a new gasket in between. All of the nuts torqued down fine with only the aft bolt going into that horrid plastic region before hitting toque. I had this a few times on these cases with the low 12NM torque 10mm bolts and will have to give my torque wrench a bit of a calibration to ensure it isn't over doing it. Mind you; it could be the 30 year old cases rightfully protesting at not being turned into bean tins yet.
Cams followed the head with a fair bit of faffing to get them to engage the drive gear at the correct angle. The exhaust was fine but I struggled to get the inlet right as the anti chatter gear would engage first pushing the cam one tooth out. this was hard to see at TDC 1 cylinder firing so I turned it to TDC 4 cylider firing where the markers face each other in the middle where it was far easier to see when the cams were aligned. This did make getting the anti chatter gear in even harder due to cam lobe positions but a bit of persuasion with a flat blade got it in the right place whilst I carefully wound the cam retainers in. These were all torqued down and suddenly the engine was all but done.
I could now stick the engine to one side and get on with sorting the poorly RD engine out.

Comments
Post a Comment